Aerospace industry and aircraft engine building are rated among less robotic industries.
Several reasons can explain this:
– structural complexity of the product (the presence of many small parts that make installation difficult
by robots);
– prime requirements for the performance;
– availability of intermediate control (often with the help of complex equipment);
– small scale interchangeability of parts and components.
These requirements severely restrict the ability to automate production and installation processes or make them inefficient. Therefore, manual labor is still used in the assembly, although it creates certain risks because
of people’s mistakes. The effect of the human factor remains significant, despite the regular professional development of specialists, their training, as well as documentary and production control.
Therefore, there is a problem of monitoring assembly processes and people's work in actual time to minimize negative consequences. To solve it, we propose to use computer vision.
This raises several questions: whether it is possible to apply computer vision at the stages of the technological process and in the people actions during the execution of an operation, how to train such a model to recognize all the required actions [1] and whether this process can be automated.
The source analysis
Nowadays, there is a vast amount of materials devoted to object recognition algorithms, their libraries, and the results got in various industries. Special attention in the research has been given to defectoscopy and the use of machine vision at enterprises. The programs are developed specifically for the practical application of the technology of object recognition in a video (or photo) with actual objects.
For example, when working with microelectronics, it is very important to recognize the components of the board and inspect them visually for defects. A team of researchers led by Baigin proposed their own machine vision system based on the Otsu method and the Hough transform [2]. Sometimes more complex problems require the use of non-standard approaches. One example is the system for recognizing defects in Stozhanovich's textiles [3]. Its peculiarity is that neural networks are used to search for a defect in actual time. For 2001, this was a big breakthrough. For more successful recognition, it pays special attention to the preprocessing process. A carefully developed concept of using preprocessing can be found in Sartak, whose program allows you to get images of defective parts with high accuracy and sort them using the TensorFlow library [4]. Neural networks are becoming an increasingly popular tool in the industry, combining different approaches to solve problems, for example, in the case of identifying the geometry of parts [5].
Problem formulation
The design process is constantly changing. It reflects this in the design documentation. The item (node, item) passes the stage of approval and is supplied to the production. If the installation is not possible, documents are created to correct defects, and the design process is started again until the object is installed in the specified location according to the technical problem. Accordingly, it is necessary to create a recognition model that can identify assembly units in photos (or videos) before the physical creation of parts [6].
Initial data
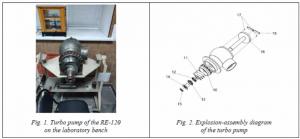
As a sample, there was a turbo pump (TP) of a rocket engine (Fig. 1).
Assembly/disassembly of the TP comprises 10 positions: housing assembly, turbine rotor, retainer, screw (x2), impeller, conveyor screw, large nut, large reflector, small reflector, small nut. These names are conditional and are used only within the framework of laboratory work (Tabl. 1). The numbers in the name show the number in the assembly sequence in the lab form (Fig. 2).
It bases part selection on the requirements for recognition models. It is necessary to check whether it can distinguish between objects:
– with different geometries;
– with approximately the same geometry;
– several ones at once.
Thus, there were the following groups of parts:
– small nut and screw;
– small nut and large nut;
– small nut, screw, small reflector, and turbine rotor.
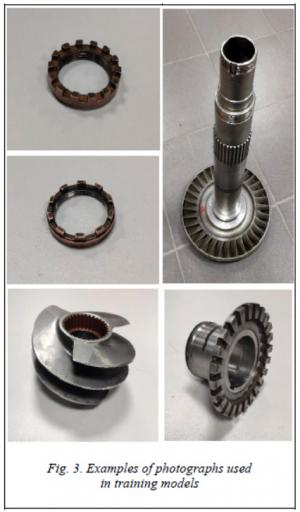
To test the recognition capability, we selected the following groups of initial data: screenshots of models and a mixture of screenshots of parts with their photos (Fig. 3). Thus, we tested the hypothesis it is possible to form a data set at the design stage (using screenshots of the designed parts) and check how accurately the details will differ on the mixed data set.
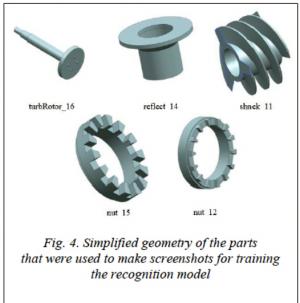
Since there was no documentation for this unit, all three-dimensional models of parts were made using reverse engineering technology (scanned with a METRIS MC30M7 scanner, 2008), and the resulting point cloud was processed in Geometrix Design X software. During processing, the appearance of the models was simplified. Figure 4 shows the result of such processing.
Experiment
Data sets
Eventually, six data sets were generated.
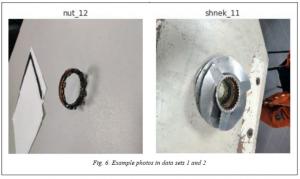
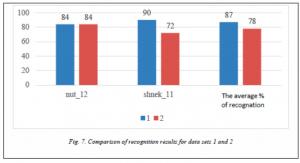
1) Data set 1: screenshots of the nuts (nut_12) and screw (shneck_11).
2) Data set 2: images and screenshots nuts (nut_12) and screw (shneck_11).
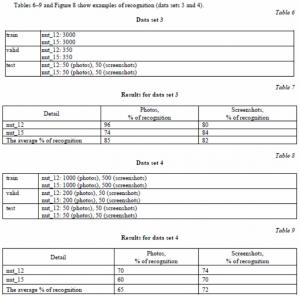
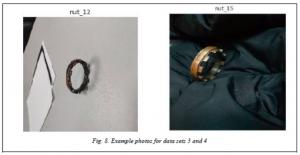
3) Data set 3: screenshots of two similar parts – nuts (nut_12) and nuts small (nut_15).
4) Data set 4: photos and screenshots of two similar parts – nuts (nut_12) and nuts small (nut_15).
5) Data set 5: screenshots of four parts – screw (shneck_11), turbine rotor (turbRotor_16), large nut (nut_12), reflector (reflect_14).
6) Data set 6: photographs and screenshots of four parts – screw (shneck_11), turbine rotor (turbRotor_16), large nut (nut_12), reflector (reflect_14).
The usable model
The changed Alexnet network – convolutional neural Network (CNN, Convolutional Neural Network) was used as a model for training in this work [7]. AlexNet has had a major impact on machine learning, especially in the application of deep learning to machine vision. (As of 2020, the paper on AlexNet has been cited over 24,000 times.)
AlexNet contains eight layers: the first five are convolutional, and the next three are fully connected layers. As an activation function, ReLU was used, which showed an improvement in training performance compared to tanh and sigmoid [8].
To speed up network learning, we used an approach based on adding normalizing layers at the learning stage [9].
Also in the network architecture, the size of the sub-sample core (max-pool) was reduced from 3x3 to 2x2, since this size is more often used and speeds up network training [10].
Using the architecture of the Alexnet network is because of its study and relatively small depth (a few hidden layers), which facilitates the learning process of the classifier and allows you to ensure a low computational complexity of the feature extraction process relative to other network architectures.
Image augmentation
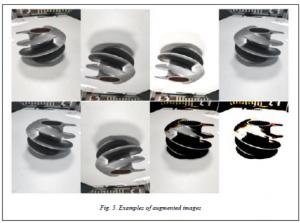 To improve the classification accuracy [11] and reduce the over-training effect, the original data set
(Fig. 3) was increased by 10 times by various transformations (Fig. 5). It preserved data balancing – it aligned the number of images of different types of parts. Augmentation was performed by changing the orientation, brightness, contrast of the image, its chroma, and using affine transformations [12].
The experiment progress
During the experiment, the model was trained first on two different parts, then on two fairly similar ones, then on a larger number of parts (four). At the same time, in each case, the training was carried out first exclusively on screenshots, and then using photos. Each time, the model was trained anew on the corresponding details (Tabl. 2–5).
Figure 6 shows an example of recognizing data sets 1 and 2.
Comparison of results (data sets 1 and 2)
When using actual photos in training, the recognition result is worse on average-it fell by 9 % (Fig. 7).
Comparison of results (data sets 3 and 4)
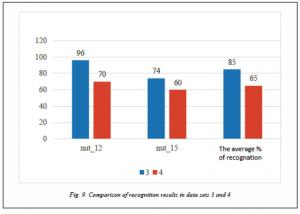
When using actual photos in training, the recognition result is on average worse – it fell by 20 % (Fig. 9).
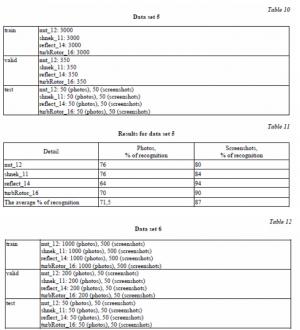
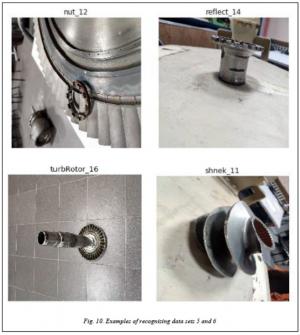
Tables 10–13 and figure 10 provide examples of recognition (data sets 5 and 6).
Performance evaluation of the proposed approach
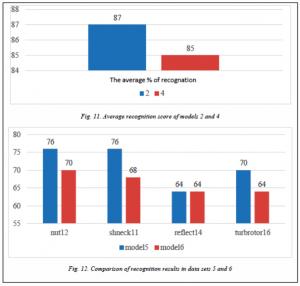
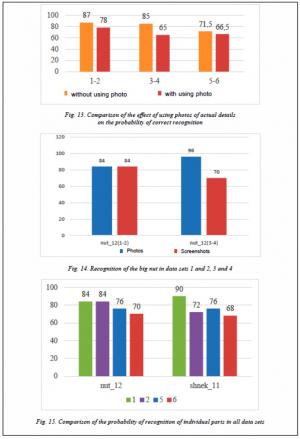
Let's check the effect of similarity of details on the probability of correct recognition. A comparison of the results (data sets 2 and 4) showed that when using sufficiently similar parts (of the same type) for training, the average recognition level is 2 % lower (Fig. 11).
Let's take the data of photo recognition in each experiment: in all cases, the average percentage of recognition using photos was lower (Fig. 12, 13). Based on the data got, we can also note it that even an inferior quality of the CAD model can provide a recognition probability of over 70 %. This is a fairly significant result (Fig. 14). However, an increase in the number of recognized objects in the model leads to a decrease in the numerical value of the recognition probability (Fig. 15). The reasons may be an insufficient number of photos/screenshots for training the model, insufficient quality of CAD models, settings of training parameters.
Based on the data got, we can also note it that even an inferior quality of the CAD model can provide a recognition probability of over 70 %. This is a fairly significant result (Fig. 14). However, an increase in the number of recognized objects in the model leads to a decrease in the numerical value of the recognition probability (Fig. 15). The reasons may be an insufficient number of photos/screenshots for training the model, insufficient quality of CAD models, settings of training parameters.
The results got require careful verification with many images for training and with improved CAD models.
Another unusual result is differences in the recognition of a model with a pair of different parts (data set 1) and with the same data set (data set 3) (Fig. 14)
The example of part nut_12 shows that the part was recognized worse in the data set with shneck_11 than in the data set with nut_12 (Fig. 15). thus, it can be concluded that not always differences in geometry can guarantee a high-quality definition of the detail in the image. We need additional experiments to determine the cause of this behavior.
We should note it that the recognition of parts was carried out only individually, not as part of a group or assembly.
Model effectiveness evaluation
The highest recognition rate is 96 % (3, training on screenshots, similar details), the lowest is 36 %
(2, training using photos). the overall average recognition rate for models trained in screenshots is 73.875 %.
The highest recognition rate (96 %) shows the model’s effectiveness. A large difference between the largest indicator and the average total (22.125 %) may indicate that the data is not preprocessed well enough, rather than that the model is ineffective.
Conclusion
Despite the inferior quality of models from the CAD program, the average recognition rates in the photo (over 70 %), and the small amount of data in the set, the results of the experiments can be called successful. We confirmed that it is possible to recognize real details in photos, focusing only on the images of the CAD-editor workspace. This result gives grounds to argue that with competent training of models, creating a computer vision algorithm, and high-quality three-dimensional details, you can create a program that could learn only from screenshots and show a high-precision result of determining the object in the photo.
Acknowledgements: The authors express their gratitude to the Scientific Supervisor Associate Professor A.V. Ionov for the provided equipment and assistance in the work.
References
1. Viswakumar A., Rajagopalan V., Ray T., Parimi C. Human gait analysis using OpenPose. Proc. ICIIP 2019, IEEE, 2019, рр. 310–314. DOI: 10.1109/ICIIP47207.2019.8985781.
2. Baygin M., Karakose M., Sarimaden A., Akin E. Machine vision based defect detection approach using image processing. Proc. IDAP, IEEE, 2017, рр. 1–5. DOI: 10.1109/IDAP.2017.8090292.
3. Stojanovic R., Mitropulos P., Koulamas C., Karayiannis Y., Koubias S., Papadopoulos G. Real-time vision-based system fortextile fabric inspection. Real Time Imaging, 2001, no. 7, pp. 507–518. DOI: 10.1006/
rtim.2001.0231.
4. Shetty S.J. Vision-based inspection system employing computer vision & neural networks for detection of fractures in manufactured components. ArXiv, 2019. Available at: https://arxiv.org/ftp/arxiv/papers/1901/1901.08864.pdf (accessed October 18, 2020).
5. Jinjiang W., Fu P., Gao R. Machine vision intelligence for product defect inspection based on deep learning and Hough transform. Journal of Manufacturing Systems, 2019, no. 51, pp. 52–60. DOI: 10.1016/
J.JMSY.2019.03.002.
6. Joshi K.D, Vedang Chauhan, Surgenor B. A flexible machine vision system for small part inspection based on a hybrid SVM/ANN approach. Journal of Intelligent Manufacturing, 2020, vol. 1, no. 31, pp. 103–125. DOI: 10.1007/S10845-018-1438-3.
7. Krizhevsky A., Sutskever I., Hinton G. ImageNet classification with deep convolutional neural networks. Communication of the ACM, 2017, vol. 60, no. 6, pp. 84–90. DOI: 10.1145/3065386.
8. Goodfellow I., Bengio Y., Courville C.A. Deep Learning. Adaptive Computational and Machine Learning ser., Cambridge, MA: MIT Press, 2016, 801 p.
9. Howard A.G., Zhu M., Chen B., Kalenichenko D., Wang W., Weyand T., Andreetto M. et al. MobileNets: Efficient Convoluntional Neural Networks for Mobile Vision Applications. ArXiv, 2017. Available at: https://arxiv.org/abs/1704.04861 (accessed October 17, 2020).
10. Dumoulin V., Visin F. A guide to convolution arithmetic for deep learning. ArXiv, 2016. Available at: https://arxiv.org/abs/1603.07285 (accessed October 17, 2020).
11. Agnieszka Mikołajczyk, Michał Grochowski. Data augmentation for improving deep learning in image classification problem. Proc. IIPhDW, 2018, pp. 117–122. DOI: 10.1109/IIPHDW.2018.8388338.
12. Fawzi A., Samulowitz H., Turaga D.S., Frossard P. Adaptive data augmentation for image classification. Proc. ICIP, IEEE, 2016, pp. 3688–3692. DOI: 10.1109/ICIP.2016.7533048.
УДК 65.011.56
DOI: 10.15827/2311-6749.20.4.1
Нейросетевые модели распознавания элементов сложных конструкций
в системах компьютерного зрения
М.В. Сёмина 1 , студент, mvsyomina@gmail.com
Е.С. Агешин 2 , ассистент преподавателя, ageshin.e@mail.ru
1 Московский авиационный институт (национальный исследовательский университет), кафедра прикладной информатики, г. Москва, 125993, Россия
2 Московский авиационный институт (национальный исследовательский университет), кафедра технологии производства двигателей летательных аппаратов, г. Москва, 125993, Россия
В данной статье представлен эксперимент в области компьютерного зрения, направленный на автоматизирование обучения нейросети распознавать промышленные объекты на примере деталей турбонасосного агрегата ракетного двигателя РД-120. Для обучения нейронной сети использовались как набор данных, состоящий из фотографий уже существующих деталей, так и набор изображений из CAD-программы, имитирующий собой стадию проектирования требуемого изделия.
При сравнении результатов эксперимента подтвердилась гипотеза о том, что возможно обучить системы компьютерного зрения различать еще не существующие объекты на основе скриншотов их цифровых двойников (CAD-модели). Собирая необходимые данные до непосредственного производства продукта, можно добиться хороших показателей распознавания даже реального объекта с простой геометрией.
В статье представлены результаты применения такого метода в сравнении с традиционным подходом обучения, а также рассмотрены перспективы использования данной технологии в промышленности.
Ключевые слова: компьютерное зрение, сборочный процесс, система контроля, производство, python, авиационная промышленность, keras, аэрокосмическая промышленность, промышленные роботы, распознавание объектов.
Благодарности. Авторы выражают благодарность руководителю работы доценту А.В. Ионову за предоставленное оборудование и помощь в работе.
Литература
1. Viswakumar A., Rajagopalan V., Ray T., Parimi C. Human gait analysis using OpenPose. Proc. ICIIP 2019, IEEE, 2019, рр. 310–314. DOI: 10.1109/ICIIP47207.2019.8985781.
2. Baygin M., Karakose M., Sarimaden A., Akin E. Machine vision based defect detection approach using image processing. Proc. IDAP, IEEE, 2017, рр. 1–5. DOI: 10.1109/IDAP.2017.8090292.
3. Stojanovic R., Mitropulos P., Koulamas C., Karayiannis Y., Koubias S., Papadopoulos G. Real-time vision-based system fortextile fabric inspection. Real Time Imaging, 2001, no. 7, pp. 507–518. DOI: 10.1006/rtim.2001.0231.
4. Shetty S.J. Vision-based inspection system employing computer vision & neural networks for detection of fractures in manufactured components. ArXiv, 2019. URL: https://arxiv.org/ftp/arxiv/papers/1901/1901.08864.pdf (дата обращения: 18.10.2020).
5. Jinjiang W., Fu P., Gao R. Machine vision intelligence for product defect inspection based on deep learning and Hough transform. Journal of Manufacturing Systems, 2019, no. 51, pp. 52–60. DOI: 10.1016/J.JMSY.2019.03.002.
6. Joshi K.D, Vedang Chauhan, Surgenor B. A flexible machine vision system for small part inspection based on a hybrid SVM/ANN approach. Journal of Intelligent Manufacturing, 2020, vol. 1, no. 31, pp. 103–125. DOI: 10.1007/S10845-018-1438-3.
7. Krizhevsky A., Sutskever I., Hinton G. ImageNet classification with deep convolutional neural networks. Communication of the ACM, 2017, vol. 60, no. 6, pp. 84–90. DOI: 10.1145/3065386.
8. Goodfellow I., Bengio Y., Courville C.A. Deep Learning. Adaptive Computational and Machine Learning ser., Cambridge, MA: MIT Press, 2016, 801 p.
9. Howard A.G., Zhu M., Chen B., Kalenichenko D., Wang W., Weyand T., Andreetto M. et al. MobileNets: Efficient Convoluntional Neural Networks for Mobile Vision Applications. ArXiv, 2017. URL: https://arxiv.org/abs/1704.04861 (дата обращения: 17.10.2020).
10. Dumoulin V., Visin F. A guide to convolution arithmetic for deep learning. ArXiv, 2016. URL: https://arxiv.org/abs/1603.07285 (дата обращения: 17.10.2020).
11. Agnieszka Mikołajczyk, Michał Grochowski. Data augmentation for improving deep learning in image classification problem. Proc. IIPhDW, 2018, pp. 117–122. DOI: 10.1109/IIPHDW.2018.8388338.
12. Fawzi A., Samulowitz H., Turaga D.S., Frossard P. Adaptive data augmentation for image classification. Proc. ICIP, IEEE, 2016, pp. 3688–3692. DOI: 10.1109/ICIP.2016.7533048.




Comments